Dimscreen
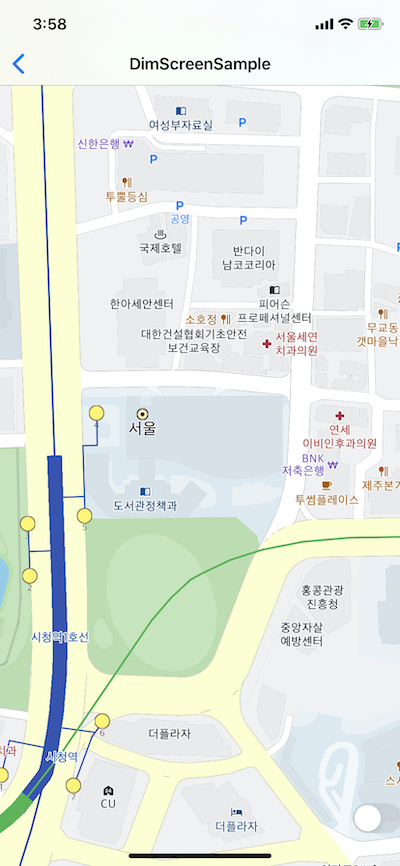
DimScreen은 지도 뷰 전체를 가리는 스크린 객체입니다. 아래와 같이 지도 전체를 어둡게 가릴 수 있으며, DimScreen의 컬러도 별도로 지정할 수 있습니다. DimScreen에 하이라이트 폴리곤을 추가하여 특정 부분을 강조해서 표시할 수 있습니다.
| DimScreen OFF | DimScreen ON |
|---|---|
 |
 |
dimScreen은 KakaoMap 뷰에 속해있으며, 아래와 같이 KakaoMap에서 DimScreen을 가져와서 사용할 수 있습니다.
	let mapView: KakaoMap = let mapView: KakaoMap = mapController?.getView("mapview") as! KakaoMap
    mapView.dimScreen.isEnabled = dimScreenSwitch.isOn  // DimScreen을 on/off 한다.
KakaoMap에서 dimScreen객체는 ShapeManager의 스타일 추가 및 Shape를 추가할 수 있는 일부 기능을 가지고 있습니다. dimScreen에 PolygonShapeStyle을 추가하여 하이라이트 PolygonShape/MapPolygonShape를 표시할 수 있고, 이 PolygonShape/MapPolygonShape에 애니메이터를 동작시킬 수 있습니다. 즉, dimScreen에 추가된 PolygonShape는 기존 ShapeManager에서 생성된 PolygonShape/MapPolygonShape의 기능을 그대로 계승하며, 인터페이스도 똑같이 동작합니다. 따라서 생성 이후 PolygonShape의 조작방법은 기존 PolygonShape와 동일합니다. 단, DimScreen에는 PolylineShape는 추가할 수 없습니다.
DimScreen Control
DimScreen은 따로 생성할 수 없으며, KakaoMap 객체 안에 속해있습니다. 따라서 KakaoMap으로부터 dimScreen을 가져와서 컨트롤 할 수 있습니다.
Enable/Disable DimScreen
dimScreen을 아래와 같이 enable 플래그를 설정하여 on/off 할 수 있습니다.
@IBAction func dimScreenSwitchChanged(_ sender: Any) {
	let mapView: KakaoMap = mapController?.getView("mapview") as! KakaoMap
	mapView.dimScreen.isEnabled = true  // DimScreen을 on/off 한다.
}
Dim Color
dimScreen 내부 color property를 이용하여 dimScreen의 컬러값과 투명도를 지정할 수 있습니다.
@IBAction func dimScreenSwitchChanged(_ sender: Any) {
	let mapView: KakaoMap = mapController?.getView("mapview") as! KakaoMap
        mapView.dimScreen.isEnabled = dimScreenSwitch.isOn  // DimScreen을 on/off 한다.
        mapView.dimScreen.color = UIColor(red: 0.0, green: 0.5, blue: 0.0, alpha: 0.5) // DimScreen의 컬러를 바꾼다.
}
DimScreen에 PolygonShape 추가하기
DimScreen은 ShapeLayer의 한 종류입니다. 따라서 ShapeLayer에 PolygonShape를 추가하는것처럼 DimScreen에도 PolygonShape를 추가할 수 있습니다. 단, DimScreen에서 사용하는 Style과 Animator는 모두 DimScreen객체 범위 내에서 이루어집니다. 즉, DimScreen에 추가할 하이라이트 폴리곤의 스타일은 ShapeManager가 아닌 DimScreen에서 정의해야 스타일을 사용할 수 있습니다.
주의
ShapeManager에 추가한 StyleSet은 DimScreen에선 사용할 수 없습니다. DimScreen에서 사용하는 styleSet은 dimScreen에 따로 추가해야 합니다.아래 예제는 DimScreen에 사용할 PolygonStyleSet을 생성하여 DimScreen에 하이라이트 PolygonShape를 표시하는 예제입니다.
// dimScreen에 추가할 PolygonStyleSet을 생성한다.
func createPolygonStyleSet() {
	let mapView: KakaoMap = mapController?.getView("mapview") as! KakaoMap
	let diScreen: DimScreen = mapView.dimScreen

   let shapeStyle = PolygonStyle(styles: [
   		PerLevelPolygonStyle(color: UIColor(red: 0.7, green: 0.7, blue: 0.7, alpha: 0.5), strokeWidth: 2, strokeColor: UIColor.blue, level: 0),
   		PerLevelPolygonStyle(color: UIColor(red: 0.7, green: 0.7, blue: 0.7, alpha: 0.5), strokeWidth: 2, strokeColor: UIColor.red, level: 15)
   		])
   let shapeStyleSet = PolygonStyleSet(styleSetID: "shapeLevelStyle1", styles: [shapeStyle])
   dimScreen.addPolygonStyleSet(shapeStyleSet)
}

// Dimscreen에 특정 영역을 하이라이트 표시하기 위한 PolygonShape을 생성한다.
// PolygonShape의 사용방법은 지도상에 그릴때와 동일하다.
func createDimScreenShape() {
	let mapView: KakaoMap = mapController?.getView("mapview") as! KakaoMap
	let dimScreen: DimScreen = mapView.dimScreen

	// view에 PolygonShape를 추가하는것과 동일한 방법으로 추가한다.
	// 여기서 사용하고자하는 styleSetID는 dimScreen에 미리 추가된 styleSet이다.
	let viewSize = mapView.viewRect.size
	let options = PolygonShapeOptions(shapeID: "shape1", styleID: "shapeLevelStyle1", zOrder: 1)
	options.basePosition = mapView.getPosition(CGPoint(x: viewSize.width/2, y: viewSize.height/2))
	let outter = Polygon(exteriorRing: Primitives.getCirclePoints(radius: 100.0, cw: true), hole: Primitives.getCirclePoints(radius: 80.0, cw: false), styleIndex: 0)
	let mid = Polygon(exteriorRing: Primitives.getCirclePoints(radius: 60.0, cw: true), hole: Primitives.getCirclePoints(radius: 40.0 cw: false), styleIndex: 0)
	let inner = Polygon(exteriorRing: Primitives.getCirclePoints(radius: 20.0, cw: true), hole: nil, styleIndex: 0)

	options.polygons.append(outter)
	options.polygons.append(mid)
	options.polygons.append(inner)

   // dimScreen에 highlightPolygonShape 추가
	let shape = dimScreen.addHighlightPolygonShape(options)
	shape?.show()
}
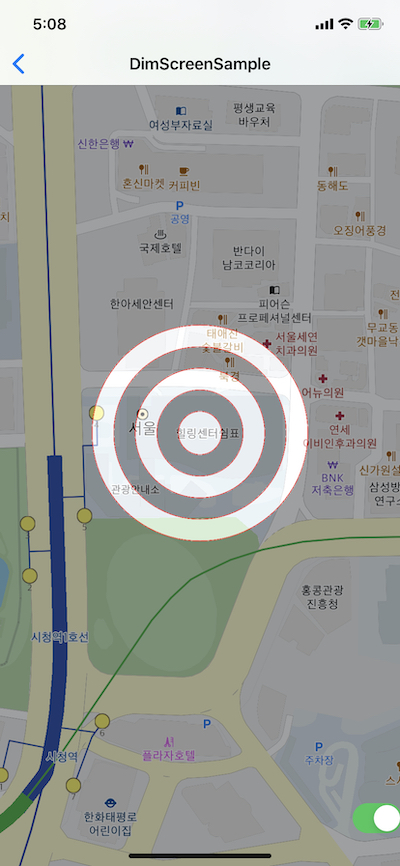
위 예제코드의 실행 결과는 아래와 같습니다.
| 0~14 | 15~21 |
|---|---|
 |
 |
이렇게 추가된 PolygonShape는 모두 dimScreen에서 레이어처럼 관리하고 있으며, 따로 제거하지 않는 이상 getPolygonShape를 이용하여 추가한 객체를 가져올 수 있습니다.
Animator
DimScreen에도 PolygonShape의 Animator를 추가할 수 있습니다. 추가 및 동작 방법은 ShapeManager에서 추가한것과 동일합니다. 단, ShapeManager에서 추가한 Animator와 DimScreen에 추가한 Animator는 공유되지 않기 때문에 똑같은 효과를 가진 Animator이고, ShapeManager에 이미 추가한 애니메이터라고 해도 DimScreen에 별도로 Animator를 추가해야 합니다.
아래 예제는 DimScreen에 PolygonShape를 추가하고, Animator를 생성하여 Animator에 해당 PolygonShape를 추가하여 동작시키는 예제입니다.
// PolygonShape 표시 스타일 생성
func createPolygonShapeStyleSet() {
	let mapView: KakaoMap = mapController?.getView("mapview") as! KakaoMap

    let shapeStyle = PolygonStyle(styles: [
        PerLevelPolygonStyle(color: UIColor(red: 0.7, green: 0.7, blue: 0.7, alpha: 0.5), strokeWidth: 2, strokeColor: UIColor.blue, level: 0),
        PerLevelPolygonStyle(color: UIColor(red: 0.7, green: 0.7, blue: 0.7, alpha: 0.5), strokeWidth: 2, strokeColor: UIColor.red, level: 15)
    ])
    let shapeStyleSet = PolygonStyleSet(styleSetID: "shapeLevelStyle1", styles: [shapeStyle])
    dimScreen.addPolygonStyleSet(shapeStyleSet)
}

// Dimscreen에 특정 영역을 하이라이트 표시하기 위한 PolygonShape을 생성한다.
// PolygonShape의 사용방법은 지도상에 그릴때와 동일하다.
func createDimScreenShape() {
	let mapView: KakaoMap = mapController?.getView("mapview") as! KakaoMap
	let dimScreen: DimScreen = mapView.dimScreen

    let viewSize = mapView.viewRect.size
    let options = PolygonShapeOptions(shapeID: "shape1", styleID: "shapeLevelStyle1", zOrder: 1)
    options.basePosition = mapView.getPosition(CGPoint(x: viewSize.width/2, y: viewSize.height/2))

    // 애니메이션 효과를 픽셀단위로 적용하기 때문에, WaveAnimation 의 start/end Pixel과 같은 크기의 Polygon을 생성하려면 해당 폴리곤의 radius를 1.0 이하로 지정한다.
    let outter = Polygon(exteriorRing: Primitives.getCirclePoints(radius: 1.0, cw: true), hole: Primitives.getCirclePoints(radius: 0.8, cw: false), styleIndex: 0)
    let mid = Polygon(exteriorRing: Primitives.getCirclePoints(radius: 0.6, cw: true), hole: Primitives.getCirclePoints(radius: 0.4, cw: false), styleIndex: 0)
    let inner = Polygon(exteriorRing: Primitives.getCirclePoints(radius: 0.2, cw: true), hole: nil, styleIndex: 0)

    options.polygons.append(outter)
    options.polygons.append(mid)
    options.polygons.append(inner)

    // DimScreen에 Highlight PolygonShape를 추가한다.
    let shape = dimScreen.addHighlightPolygonShape(options)
    shape?.show()

    // DimScreen에 추가할 애니메이터 효과를 생성
    let effect = WaveAnimationEffect(datas: [
        WaveAnimationData(startAlpha: 0.8, endAlpha: 0.0, startPixel: 10.0, endPixel: 100.0, level: 0),
        WaveAnimationData(startAlpha: 0.8, endAlpha: 0.0, startPixel: 50, endPixel: 500, level: 15)
    ])

    // 애니메이터를 DimScreen에 추가.
    let animator = dimScreen.addShapeAnimator(animatorID: "circleWave", interpolation: AnimationInterpolation(duration: 1500, repeat: 15, method: .cubicOut), effect: effect, hideAtStop: true)

    // animaotr 추가.
    animator?.addPolygonShape(shape!)
    animator?.start()
}
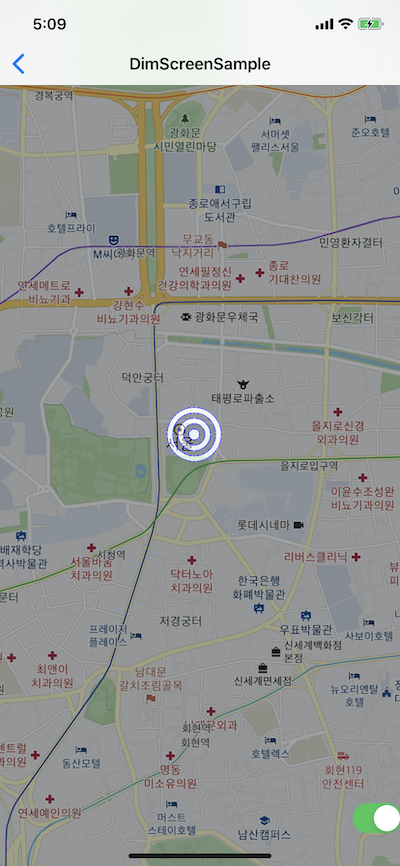
위 예제의 실행 결과는 아래와 같습니다.

DimScreen에 추가된 Animator는 기본적으로 DimScreen에 추가된 PolygonShape, MapPolygonShape만 포함할 수 있습니다. 즉, DimScreen에는 PolylineShape 종류를 추가할 수 없기 때문에 DimScreen에 추가한 Animator에는 PolylineShape도 넣을 수 없습니다.